Hosting a Backyard Movie Night Under the Stars

Recent data suggests that nearly 70% of people feel more connected to their community when participating in outdoor social events. Hosting a backyard movie night is one of the simplest ways to bring neighbors and family together without leaving your property. This guide breaks down everything you need to set up a high-quality outdoor cinema, from selecting the right tech to managing the unpredictable Atlantic weather.
How Much Does a Backyard Movie Setup Cost?
A basic backyard movie setup can cost anywhere from $150 to over $1,000 depending on the quality of the projector and the size of your screen. If you are on a budget, you can get by with a mid-range projector and a white bedsheet. However, for a truly cinematic experience, you'll want to invest in dedicated hardware.
To help you plan, I’ve broken down the potential costs for different tiers of setups. It's worth noting that you don't need to buy everything at once—you can start small and upgrade as your hosting-game improves.
| Tier | Estimated Cost | What's Included |
|---|---|---|
| The Budget Setup | $100 - $250 | Budget projector, bedsheet screen, and basic Bluetooth speaker. |
| The Enthusiast | $400 - $800 | HD Projector, dedicated tripod screen, and a decent soundbar. |
| The Pro Home Cinema | $1,200+ | 4K Projector, inflatable screen, and a high-end surround sound system. |
If you're looking for a reliable starting point, brands like projectors vary wildly in brightness (lumens). For outdoor use in a backyard, aim for at least 2,000 lumens so the image doesn't look washed out by any stray light from streetlamps or porch lights.
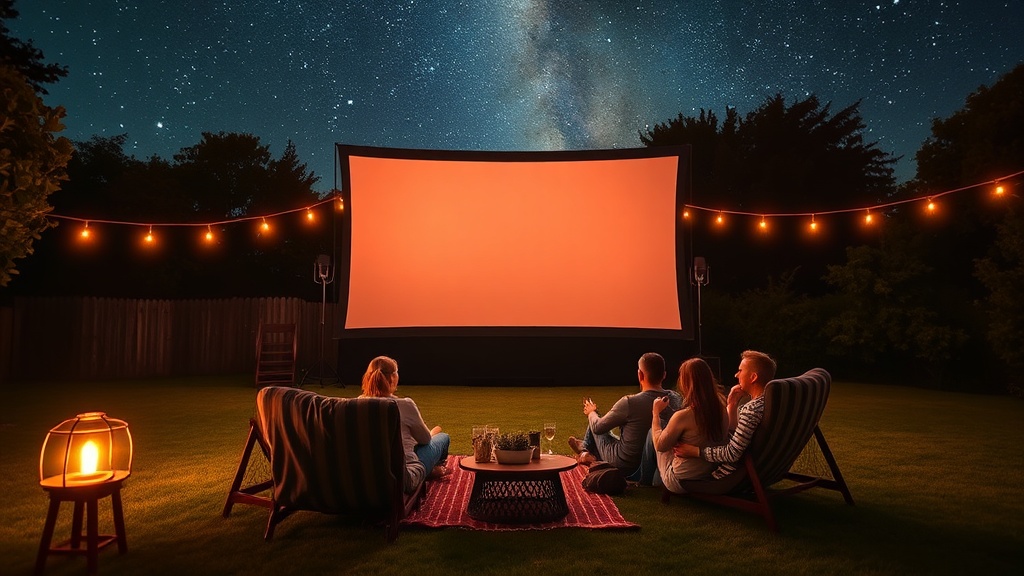
What Is the Best Equipment for an Outdoor Movie Night?
The best equipment for an outdoor movie night consists of a high-lumen projector, a portable sound system, and a stable surface for seating. You want to prioritize audio because, in a wide-open backyard, sound tends to dissipate quickly.
First, let's talk about the visual. You have three main options for a screen:
- The Sheet: A white flat bedsheet works in a pinch. It's cheap, but it can flutter in the wind—which is a real nuisance in Newfoundland.
- The Projector Screen: A foldable tripod screen provides a professional look and stays taut.
- The Inflatable Screen: These are great for large groups because they create a massive surface area, though they require a constant power source for the blower.
For audio, don't rely on the tiny speakers built into most portable projectors. They just won't cut it for a group of six or more. Instead, pair your projector with a rugged Bluetooth speaker like the AirPods Max (if you're just using headphones) or a more robust outdoor speaker like the Sony SRS series. This ensures everyone can hear the dialogue over the sound of the wind or distant traffic.
Since we are in Atlantic Canada, the weather is our biggest variable. I always recommend checking the Environment Canada weather alerts before you even start setting up. If there is a high chance of rain, have a plan to move the party inside or use a pop-up canopy.
How Do You Prepare for Atlantic Canadian Weather?
Prepare for the weather by having a "Plan B" and investing in high-quality outdoor comfort items like heavy blankets and fire pits. Even in the summer, the temperature in Mount Pearl can drop significantly once the sun goes down.
It's a common mistake to assume a warm July evening will stay warm all night. It won't. You'll want to have a stack of blankets ready. I personally love using oversized fleece blankets or even those heavy-duty Patagonia outdoor throws if you have them. They are durable and actually hold heat well.
Here is a quick checklist for weather-proofing your event:
- Check the dew point: High humidity can lead to dampness on your seating surfaces.
- Secure your screen: Use heavy weights or sandbags on your tripod to prevent it from tipping in a sudden gust.
- Lighting: Use battery-operated LED lanterns or string lights. They provide enough light to navigate the yard without ruining the screen's contrast.
- The "Rain-Out" Plan: If the clouds look heavy, be ready to move the movie to the living room. It's better to be proactive than to spend the night moving electronics in the dark.
If you find yourself needing to transition from the backyard to the indoors due to weather, you might want to check out my previous post on cozy spots for a rainy day to get that same sense of comfort inside.
Seating is another area where people often trip up. A standard lawn chair is fine, but for a two-hour movie, people will get uncomfortable. I suggest a mix of textures. Throw down some outdoor rugs, a few oversized floor cushions, and maybe some bean bags. If you're using a camping chair, make sure they are spaced far enough apart so people aren't bumping elbows during the intense parts of the film.
One thing to keep in mind: power cables can be a tripping hazard. If you're running a long cord from the house to the projector, use heavy-duty gaffer tape to secure it to the ground. This is a small detail, but it's the difference between a smooth evening and a trip to the emergency room.
Food and drink are the final pieces of the puzzle. A movie night isn't quite complete without snacks. Instead of a formal meal, I find that a "build-your-own" station works best. A popcorn bar with different seasonings (nutritional yeast, cinnamon sugar, or even some spicy chili powder) is a huge hit and very easy to manage. For drinks, a large galvanized bucket filled with ice and various sodas or sparkling waters keeps everyone refreshed without anyone having to run back into the kitchen every ten minutes.
If you want to keep the theme going, consider the lighting. Dim, warm light is much more inviting than the harsh glare of a porch light. If your backyard is near a garden, you might even be able to use some of the light from your outdoor setup to highlight your landscaping—much like the techniques used when keeping a garden healthy and vibrant.
The most important part of any backyard event is the atmosphere. Don't stress if the technology isn't perfect or if the wind picks up a little. The goal is to enjoy the fresh air and the company of your friends and neighbors. A few technical hiccups won't ruin the night as long as you have a warm blanket and a good movie ready to go.
Steps
- 1
Gather Your Gear
- 2
Set the Scene with Lighting
- 3
Prepare the Snack Station
- 4
Maximize Comfort with Textiles